‘The Garden Shed’ Article 1

Welcome to the first edition of what I hope to be an interesting weekly series or for the most part a seasonal series. When coming up with the name of the series many names popped into my head and I ended up with this one (Maybe a working title). I want to share on my blog my journey to becoming more self sufficient from attempting to make my own alcohol to growing my veggies.

Firstly allow me to just explain where we are with what is an overgrown mess of a back garden. When I moved into my house the back garden was a complete mess, a lot of house hold items had been burnt and destroyed in the backyard not to mention overgrown grass and numerous random objects. My front garden however is a much more pleasant sight with lovely flowers growing, my herb patch, tomatoes growing, strawberry patch, Peas and chilli and pepper plants. The front garden will stay how it is allowing a place for my little girls to enjoy the lovely summer days on some nice fresh green grass.

A mission which seems ‘almost’ impossible;

When I look at my back garden I just think bloody hell I’d much rather pay someone to do it for me, but the whole point of becoming more self sufficient to me is to save money. I will start with cutting the lawn, building the shed I recently bought and also the greenhouse I’ve acquired from a neighbour who has moved. I will then build a small raised garden bed in front of the shed and then a long thin one a long the side of the greenhouse. I’m hoping this will only be a few days work but first I need to go about picking up all the bits and bobs in the garden.

I have managed to get flagstones from a neighbour who have some spare which I will put my shed on and also put two as a path in the greenhouse. I have also got a compost bin from a family friend allowing me to throw as much as I would in the bin.

I will update this blog weekly to give you an insight on the happenings in the garden. I hope those interested in the topic at hand will certainly enjoy the series and follow my journey.

Organic Spinach, Ricotta and Pistachio Dumplings!!!

I’ve recently been able to recreate a special recipe from the Soil Association’s BOOM (Best of organic market) Awards ambassador Rosie Birkett which has been created to celebrate the Boom Awards ‘Nation’s Favourite’ Category. I was sent two recipes, in this blog I’m sharing the Organic Spinach, Ricotta and Pistachio Dumplings… How good do they sound! Thankfully I was sent an image of this recipe as I cooked it at family members house and my camera had  ran out of battery.


The Recipe;

Ingredients;

Soup; dumplings

  • 3 tbsp olive oil
  • Sprig of Thyme
  • Bay Leaf
  • 1 tbsp parsley stalks
  • 2 onions diced
  • 2 carrots diced
  • 2 sticks of celery diced
  • 1 small organic swede pealed and diced
  • 150g tinned plum tomatoes
  • 1 tbsp good red wine vinegar
  • 200g organic kale stalks removed (reserve and chopped) leaved shredded
  • 100g orzo Parsley and Chervil, to garnish grated lemon zest / organic cheddar and season to taste

Dumplings;

  • Pinch of coriander seed
  • pinch of rye seed
  • 250 ricotta
  • 10g parmesan
  • 1 garlic clove, grated
  • 100g pistachios, toasted and chopped
  • 200g spinach
  • zest of 1 organic unwaxed lemon
  • 1 tbsp. lemon juice
  • a pinch of chilli flakes
  • 2 tbsp light organic spelt flour
  • freshly grated nutmeg

Method;

To make the soup;

  1. Heat the olive oil over medium to high heat, add thyme, bay leaf and parsley stalks and stir, cook for a minute or two to infuse the oil.
  2. Add diced veg and cook, stirring for 10 to 15 minutes, until softened and smelling good.
  3. Add plum tomatoes and cook for a couple more minutes before adding 1 litre of water, vinegar and kale stalks, and bring to the boil.
  4. Reduce to a simmer and then cook for another 10 to 15 minutes allowing all the flavours to infuse. During this time make the dumplings.

To make the dumplings

  1. Dry fry the spices in a frying pan until they start to crackle. Remove and grind in a pestle and mortar. Wash spinach and then wilt in a none stick frying pan over a medium heat. There should be enough residual water from the spinach which you don’t need to add any other liquids. After a couple of minutes (once wilted) transfer the spinach to a sieve and leave over the sink to drain.
  2. Press down on the leafs of the spinach with a wooden spoon to squeeze any excess water. Once cooled and drained, chop finely.
  3. Place Ricotta in a bowl and add all the other ingredients.
  4. Season with salt and pepper and stir well to combine and incorporate all the ingredients.
  5. Oil your hands lightly with olive oil and shape them into meatball sized balls.
  6. Poach them in the minestrone. Alternatively you could bring a pan of water to the boil and cook them in the boiling water for 5 minutes, until they rise and float – removing them with a slotted spoon.

Although this recipe may seem quite daunting when you look at the amount of ingredients in fact even the most novice of cooks could give this a try. Not expensive either as most of the ingredients should already be in your cupboards!

I cooked this for myself and family who all fully enjoyed it. The flavours are fantastic and the aroma that comes off while you cook is just mouth-watering. The children also had a little bit of the grub too and surprisingly enough they wanted more!!

This recipe as stated above was created for Soil Association’s BOOM (Best of organic Market) you can nominate your favourite organic product HERE.


Chinese Chicken Curry (Slimming World)

Who loves a good #CheekyTakeaway? I know I do and that’s why when dieting I just hate

missing out on the little things like a fantastic Chinese chicken curry. So I wanted to share with you this fantastic slimming world friend Chinese Chicken Curry which is both simple to make and delicious to eat!

You Will Need;

  • 1 Green Pepper
  • 2 good size organic chicken breasts
  • 1 good size white onion
  • 3 heaped TBSP Plain flour
  • 340ml Boiling water
  • 1 Chicken stock cube
  • Soy Sauce
  • Salt & Pepper
  • 1tbsp Chinese Five Spice
  • 1tbsp Curry Powder (I used Medium Curry Powder)
  • 1/4 tsp Medium Chilli Powder
  • 1/4 tsp Tumeric
  • 1/4 tsp Garlic Powder
  • Good knob of butter

Method…. Put that phone down don’t be giving up and ordering one!

  1. Dice your chicken breasts, cut your pepper and onion to sizes of your choice
  2. Combine all the spices in a bowl to make a spice mix
  3. In a frying pan melt some coconut oil and colour your diced chicken breasts
  4. Once coloured add Salt, Pepper and a bit of soy sauce and mix in
  5. Add your Onion and Pepper to the chicken

For the sauce.

  1. In a second pan, add your knob of butter
  2. Boil the kettle and add your Chicken stock cube to your 340ml of water
  3. Once Butter is melted add your flour
  4. Then add 3/4 of your stock and same with your spice mix and scropped-served-uptir in, then add the rest of your stock and spice mix
  5. Bring to a steady boil.
  6. Once at a steady bowl pour some into your chicken, onion and green pepper.
  7. Serve with Egg Fried Rice or anything of your choice…

See simple yet delicious beats a takeaway curry and you get that feeling of making a great dish on your own.

5lb in two days! – Military Diet Day 2

jordanvsmilitary-diet

Day two of the military diet and boy was I hungry this morning, woke up at 05:00hrs (5am) and I was starving but waited for Nicky to wake up too. The diet itself has not had me hungry but this morning I was extremely peckish.


Day 2 Menu:

Breakfast: 1 slice of bread/toast, 1 egg (cooked how you like it) and half a banana. I had minediet-day-2 with water rather than a coffee as it does not say you can have one on the site.

Lunch: 1 cup of cottage cheese (awful I ended up only having half a cup), 1 hardboiled egg (6/7 minutes for soft inside or 8+ for hard) and 5 crackers. Again I just drank some water with this meal.

Dinner: 2 Hot dogs (no bun), 1/2 cup of carrots and one cup of broccoli and then for dessert 1/2 of a banana and 1/2 cup of vanilla Ice Cream.


My Thoughts:

Day 2 was harder as expected in terms of wanting more food, overall I feel the lunch was rather filling however I hated the Cottage cheese so if you’re like me check out the substitutions on the Military Diet site. The dinner was rather nice (surprisingly) Hotdogs I cooked on a low heat to warm through and the broccoli and carrots were perfectly cooked too.

The best part of the meal however was the dessert as always and I fully enjoyed it 1/2 a cup of Ice Cream is more than enough even when not on a diet.

My weight loss: After less than 48hrs I have managed to shift 5lb on the scales which is a fantastic result for 2 days!!!


Make Sure you check out Day one by clicking HERE

 Queens Head Durham – Review

QueensHead Review header.jpg

Queens Head, Gilesgate Durham Sunday Lunch Review:collection

Recently I decided to go for Sunday Lunch at a place not too far from where I live called the Queens Head. I pre-booked my table as I had heard the restaurant does get busy since being took over, located in a very accessible location not far from the City Centre, it has a small carpark to the side of the pub and some more parking further up the little side road. The pub does alternate it’s menu’s so you can see the one I had located on the right of this paragraph, as you see can the prices are very reasonable and certainly matching most other local eateries around.

First Impressions one of the most important things to me is first impressions I tend to either feel comfortable while dining or slightly uneasey dependant on how we are greeted. I was running late to my 1pm table booking and phoned the pub and was told not to worry and they’ll see us when we get there which was polite of them. Upon entering the pub two staff members were at the bar, and we were told where our seats where and greeted nicely. We went over to our table and there was a baby seat awaiting our arrival for little Holly as Lucy was away that day, having the baby seat already at the table was an extremely thoughtful idea by the staff. The spacing between tables was great they’ve not tried to over capacitate the restaurant and have designed it so you have plenty of room perfect considering we brought the pushchair as Holly was asleep.

We were asked if we wanted drinks, I opted for a pint of Coke and Nicky Diet Coke, one thing I do wish was at the table there should of been a drinks menu, there was a wine menu but none for soft drinks, beers etc. We ordered our meal, for starters we had soup of the day which was Roasted Tomato and Basil served with crusty bread, for mains I went for the Roast top side of Beef served pink and for dessert the mouth-watering Chocolate Brownie Sundae. Nicky went for the same starter however, for the main she opted for Pan Seared Breast of Chicken served with sausage meat stuffing and for dessert Belgium waffles and Ice Cream.

Wsoup
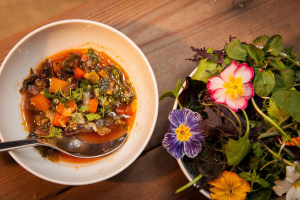
e waited a short while till our soup arrived, the dish was very well presented which sometimes I feel pubs tend to lack presentation of their food. The soup itself was okay not brilliant sadly I did not like the texture of the soup at all but the flavour was lovely especially with the bread. The one thing I did look for was some pepper to add to my soup however condiments were not at the table something I thought was a little bit of a let-down.

Odinnerur main courses, they came out and again the presentation was good you can tell the Chef takes pride in his/her dishes. The thing I loved about the main course is that your veg came on a separate dish to the meat, mash, roast potatoes and Yorkshire pudding. With them doing this it does make the meal look a lot better again going back to presentation as sometimes when it’s all on one plate it can look packed and over the top. My meat was pink like I asked and tasted splendid, the mash was lovely and creamy and roast potatoes had a nice crunchy shell and a fluffy inside. Overall I must admit the main was a complete winner and Nicky really enjoyed hers too.
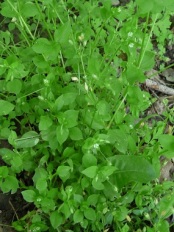
belgium-waffles

Dessert time and now we all know Desserts are the most important meal of the day (ignore those who say breakfast, they’re totally wrong). I opted for the mouth-watering Chocolate Brownie Sundae and Nicky went for the Belgium waffles. My thoughts on the Brownie Sundae was it looked good and was really tasty, I only had one issue and that was some of the brownies were a little hard but apart from that it was delicious. Nicky said hers was lovely but she much rather a little more ice cream which would have made it perfect for her.

Overall my experience at the Queens Head, Gilesgate was good, below are my ratings of each area.

Food Quality – 7/10 let down by the soup sadly could have made it 10/10.

Food presentations – 10/10 the presentation was fantastic and could not fault it.

Customer Service – 9/10 A little improvement to some staff would have made it a 10/10 however overall I was extremely happy with the service I received.

Locations and Accessibility – 10/10 Easy accessible by public transport, car and even on foot. Small carpark but does the job.

Price – 10/10 Well priced and affordable food just what you would expect from the type of establishment.

So overall I did enjoy my experience and would certainly recommend to visitor or even locals to go try it out.

Food For Free – Foraging (Ep 1)

If you’re like me then you will love cooking but you will hate spending, this new series is all about how to find, yes find food for free. People spend a lot of money on herbs, mushrooms etc in the supermarkets but why spend that money when you can go out get some exercise and find the food for free.

This month there’s not much you can forage, it’s still winter, everything is dead and only some life is starting to come back, but there are some little hidden gems you can find.


chickweed-pictureCHICKWEED:

Gardeners hate it, the word ‘weed’ is almost always regarded as a pointless plant, but why not make use of it instead of throwing it into the compost pile. If you don’t have a garden, Chickweed can be found commonly on the edge of fields throughout the year including during these frosty cold days, only forage this plant and any other plant if it is safe to do so, by this I mean generally safe i.e. not standing on a busy road and also that it has not been contaminated by pesticides and other chemicals.

Harvesting Chickweed:

Chickweed can be harvested anytime of the year except when there has been thick heavy chickweed-flower
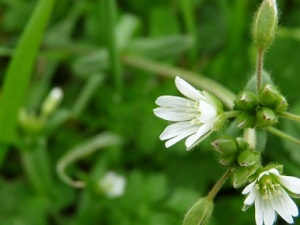
frost, you want to pick the pale soft green leaves of the plant and it’s at its best late autumn / January time. Chickweed is rather tender and has a taste similar to a mild lettuce. The leaves are far too small to pick individual (unless you have huge amount time) so strip bunches of the whole plant (Don’t take everything from the plant we must always take some from a few plants to help it grow and maintain).

Uses of Chickweed:

Chickweed can be used in salads, just wash the chickweed and use the young shoots with other plants such dandelion leaves (yes another pain in the bum weed that just gets thrown away). You can also cook chickweed but don’t over cook as it will loose taste and texture.


Oyster Mushroom:
Ooyster-mushrooms-sq-jpg
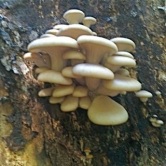
yster Mushrooms can be found in many supermarkets and can also be grown in your back yard with well prepared logs. Before I go on I want to say that I personally only ever pick mushrooms if I’m 110% that I’m picking what I’m meant to pick, there’s loads of species of mushroom and a lot are dangerous. Please don’t only just use this blog as a way to identify mushrooms do your research thoroughly.
The Oyster Mushroom is a fan-shaped bracket fungus, they can be found growing in tree-trunks. The are grey or slate blue in colour, flesh is white, soft and rubbery.
Harvesting Oyster Mushrooms:
Found on dead and/or dying branches of ash or beech, rather common throughout the year although mainly during late Autumn / W9inter. It is usually easy to gather large quantities of this mushroom as it grows in clusters.
Uses of Oyster Mushrooms:
Make sure you check the mushroom carefully for maggots and also choose younger mushrooms as the older ones do tend to be rather tough, the flavour of Oyster Mushrooms are relatively mild, this therefore allows them to be served with rich sauces. They can also be dried, added to stews and even to casseroles (try them with a sausage casserole).

Velvet Shank:

velvet-shankCould also be known as Velvet Foot this fungi is one of a few that can survive the thick frosts, during the winters months it is easier to forage as the risks of confusing Velvet Shank for another species is lowered due to the lack of other mushrooms able to survive the cold frosts.
Common in clusters on stumps and trunks, they have tufts of orange / yellow caps, with stems yellow darkening to dark brown.
Harvesting Velvet Shank:
They can be picked even when they frost have hit and they’re frozen unlike the Oyster Mushroom.
Uses of Velvet Shank:
Get rid of the stems and wipe the horrid stickiness from the cap before using the fungi, add them towards the end of stews.

I hope you enjoyed the first edition of Food For Free, throughout the year I will share these blogs and hope they will not only be a good read but educational and useful to those who find interest in foraging.